It is important to recognize that your concealed carry journey does not end at getting your license or permit and taking an NRA Basic Pistol course. Your journey should take you to the next level—an NRA Concealed Carry Workshop (CCW). This course teaches you how to safely deploy your firearm and defend yourself against an unprovoked attack.
When carrying a firearm, safety is always the top priority. Always practice with an unloaded firearm so that you become comfortable and build confidence in the way in which you will be carrying. This course teaches you these steps with a slow and intentional focus on each one, so your moves are deliberate and controlled. With practice, you will naturally speed up and become more proficient. Remember: Slow is smooth, smooth is fast. The NRA CCW course teaches you the nine steps to defending yourself if the use of deadly force is necessary to protect yourself against an attacker. These steps are: access; grip chest; pull; rotate; join; extend fire (if necessary); scan/assess; and holster.
1. Access
Access is the first step, and is the most critical because if you cannot get to your firearm when you need it in a self-defense situation, it is useless. Practice with either a closed-front shirt like a sweatshirt, or an open-front shirt like a button-down or vest. To access your firearm from your holster, swiftly sweep your open-front shirt out of the way with a bladed trigger hand and a rigid thumb or grab the edge of your closed-front shirt with your support hand and raise it high enough to expose your firearm.
It is crucial to make sure you properly grip your firearm in this initial step. This is the foundation for the subsequent steps. Quick access to your firearm followed by a proper grip also ensures you maintain control of your firearm from the start and through the remaining steps.

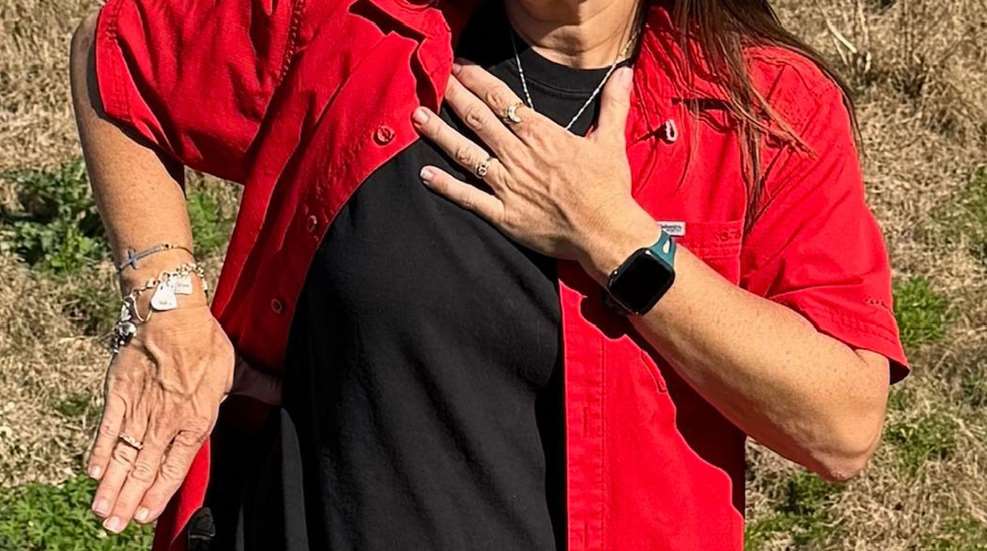
2. Grip Chest
Gripping the chest is the second step and crucial because failing to do so can lead to serious bodily injury or death to the shooter. Failing to properly do this step can lead to the shooter shooting his or her own support hand in the hand, wrist, or arm where major blood vessels, including the radial and ulnar arteries, are located. A bullet in this area can lead to massive blood loss and hemorrhaging that can cause death.
It is a natural reflex to throw your support hand up, especially in a stressful situation like fending off an attacker, while at the same time drawing your concealed weapon for self-defense. Through proper training and regular dry fire practice, you can train yourself to immediately grip your chest when you access your firearm, to ensure you do not sweep any part of your support hand, wrist, or arm in front of your gun’s muzzle.
3. Pull
The third step “pull,” can be performed safely only if the “access” and “grip chest” steps are correctly performed. When you are ready to pull, ensure your grip is secure and in the correct location on your firearm. Pull your firearm straight up and out of your holster, high enough to make certain the muzzle clears the holster. You are still gripping your chest with your support hand in this step.

4. Rotate
“Rotate” is performed only after the firearm is pulled above and clear of the holster. Rotate your wrist up and your elbow down, so your forearm is parallel with the ground and the muzzle is pointed at your target. At this time, if your gun has a safety, you can take it off and move your finger to the trigger. Your support hand is still placed on your chest.
Once the gun has rotated, if necessary, the shooter can start shooting one-handed from this position. Note that firing one-handed from the rotate step greatly increases the risk of a semi-automatic firearm malfunctioning. Since it can be difficult to provide a stable platform in this position from which the action can properly work, the chances of having a “stovepipe” or a “double feed” increase.

5. Join
In the “join” step, the support hand slides from the chest and from the rear of the firearm to meet up with the gun hand and form the two-handed grip. If your choice of CCW is a revolver, the proper grip is to rest the butt of the firearm in the support hand while wrapping the fingers of this hand around the fingers of the gun hand. The last step in this grip is thumb on thumb nail, ensuring the thumb of the support hand is placed on top of the thumb nail of the gun hand.
If you carry a semi-automatic pistol, the grip varies slightly. Once again, the support hand is dropped from the chest and comes from behind the firearm to attain the proper grip of the CCW. The palm of your support hand comes to the palm of your gun hand, and fingers wrap around the fingers of the gun hand positioned around the front strap. The thumb of the support hand lies along the slide beneath the thumb of the gun hand. Securing a proper two-handed grip on the “join” step helps maintain control of the firearm if one must begin shooting from this position.

6. Extend
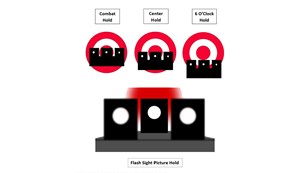
“Extend” is the step when the firearm that is correctly held in both hands is pushed forward toward the threat. Once your arms have extended, the firearm should be correctly supported, especially if using a semi-automatic firearm, so that the action can operate properly and reduce the chance of a malfunction or stoppage. During the “extend” step, the shooter can also get into a proper stance and acquire the proper sight alignment and sight picture. Be mindful that when extending the firearm, keep it parallel with the ground and not sweep the muzzle up or down.
7. Fire (if necessary)
Once you have extended your CCW, you will have to make the decision whether to fire or not, based on the situation you are in. Firing your gun is a choice to make only if there is an imminent threat to severe bodily injury or death. It is a tool of last resort.
8. Scan and Assess
Scanning and assessing is a very important step because it allows you to identify other potential threats. This is done by keeping your firearm pointed in the direction of the attacker, whether he or she is on the ground or run off and pivoting to look over each of your shoulders to determine if the first attacker had accomplices and may be approaching from the rear.

When scanning and accessing, look to the right and then look to the left. Keep the muzzle pointed forward and take a step back with your right foot to maintain balance and look over your right shoulder and behind you. Then take a step back with your left foot to maintain balance and look over your left shoulder and behind you.
Once you are certain that all threats to your safety or the safety of other innocent people have ceased, your pistol should be de-cocked or the safety engaged prior to holstering.

9. Holster
When you holster, or re-holster, it is important that you do so “reluctantly.” This means that you do not take your eyes off any threats or potential threats while you slowly re-holster your gun. You do this in case the threat reappears, or a new one emerges. You can stop the re-holstering process and re-engage the target or targets. Potential threats include an attacker on the ground that you just shot, the area in which an attacker fled, or direction of any other potential attackers.
The only time you re-holster is when you are certain that the threat is neutralized, when the police arrive on the scene, or if ordered to do so by law enforcement. Just remember to be ready to re-draw and properly go through the steps to engage new threats or a second attack.
When preparing to holster, repeat the steps in reverse. While keeping the muzzle pointed at your target, pull in the gun toward the middle of your chest. Remove your support hand from the gun and return it to the “grip chest” position. With your finger off the trigger, rotate the muzzle towards the ground and guide it into the holster, slowly and reluctantly.
Simply having a concealed carry permit is not enough. You must learn and practice how to access your concealed firearm to defend yourself. The best way to do that is to find a certified NRA CCW Instructor in your area and take a course. Remember, you are responsible for your own safety and security. With practice, your confidence will build, and you will be better prepared for a situation if you ever have to retrieve your CCW.